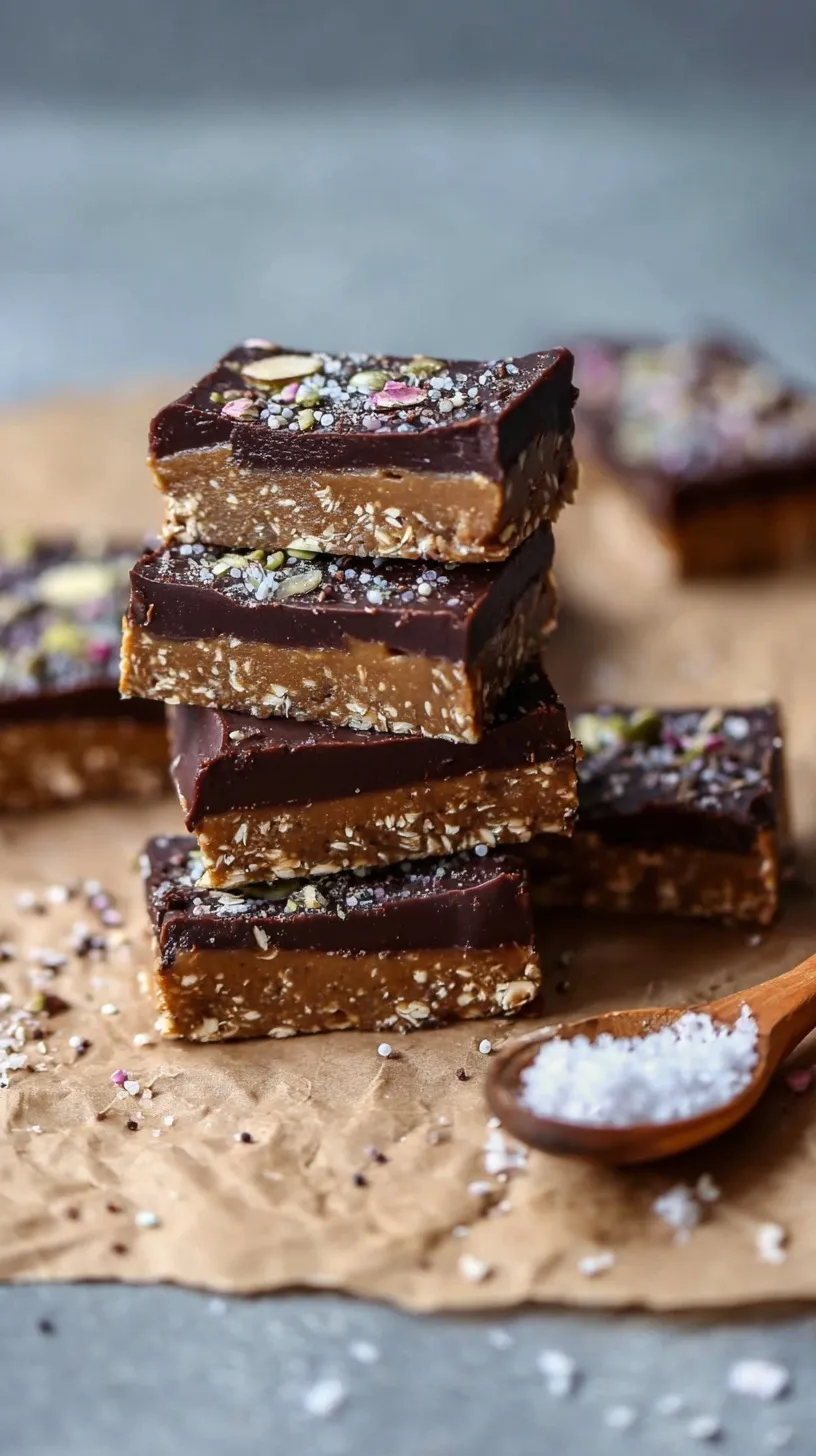
It is 3pm and you need a quick energy boost. You want something sweet but also filling for your family. These homemade protein bars are the perfect solution for your busy days.
They are chewy, chocolatey, and taste like a treat. You can whip them up in minutes without even turning on your oven. This recipe delivers a fudge-like texture that everyone will love.
Why You’ll Love This Recipe
This recipe is a total game-changer for your weekly meal prep routine. You know exactly what ingredients are going into your body. There are no strange fillers or hidden sugars here.
These bars are incredibly budget-friendly compared to store-bought options. They are also kid-approved and perfect for school lunchboxes. You will love having a healthy snack ready whenever hunger strikes.
Simple Method
Making these bars is as simple as stirring and pressing. You only need one bowl and a square pan. Even if you are a beginner, you can master this no-bake recipe easily.
The dough comes together quickly with just a spatula. You will feel so satisfied seeing these fresh snacks in your fridge. It is a stress-free way to fuel your family.
Simple Ingredients
These bars use mostly pantry staples you likely already have. Fresh nut butter and pure maple syrup create a wonderful natural sweetness.
- 2 cups certified gluten-free oat flour
- 1 cup vanilla whey or plant-based protein powder
- 1/2 cup natural creamy peanut butter
- 1/2 cup pure maple syrup or honey
- 1/4 cup unsweetened almond milk
- 1/2 teaspoon fine sea salt
- 1/2 cup dark chocolate chips
- 1 teaspoon coconut oil
Step-by-Step
- Line an 8×8-inch square baking pan with parchment paper, leaving a slight overhang on two sides for easy removal.
- In a large mixing bowl, whisk together the oat flour, protein powder, and sea salt until no lumps remain.
- Add the natural peanut butter and maple syrup to the dry mixture. Stir with a stiff spatula until a thick, crumbly dough forms.
- Gradually add the almond milk, one tablespoon at a time, mixing thoroughly until the dough is moist enough to hold together when pressed between fingers but not sticky.
- Transfer the mixture to the prepared baking pan and press firmly into an even layer using a flat-bottomed glass or a spatula.
- In a small microwave-safe bowl, combine the dark chocolate chips and coconut oil. Heat in 30-second increments, stirring in between, until completely smooth.
- Pour the melted chocolate over the pressed bar mixture and spread evenly to the edges.
- Place the pan in the refrigerator for at least 30 minutes to allow the base to firm up and the chocolate to set.
- Using the parchment overhang, lift the block out of the pan and place it on a cutting board.
- Slice into 12 equal rectangular bars using a sharp knife. Store in an airtight container in the refrigerator for up to 10 days.
Best Ways to Enjoy It
Serve these bars chilled for the best chewy texture. They look beautiful when the dark chocolate is smooth and glossy. Pack them into containers for easy weekday lunches or post-workout snacks.
Pair a bar with a piece of fresh fruit for a balanced breakfast. You can also enjoy one with a warm cup of coffee. They are the ultimate on-the-go fuel for your active lifestyle.
How to Store Leftovers
Keep your bars in an airtight container in the refrigerator. They will stay fresh and delicious for up to ten days. For longer storage, you can wrap them individually and freeze them. Freezing these bars is a great way to always have snacks ready. Just let them sit at room temperature for a few minutes before eating.
Recipe Tips
- Don’t skip the parchment paper for easy removal.
- Use a flat-bottomed glass to press the bars firmly.
- Add the almond milk slowly to avoid a sticky dough.
- Wipe your knife between cuts for clean chocolate edges.
- Choose a natural nut butter that is drippy and smooth.
- Make these on Sunday to have your meal prep sorted.
- Sprinkle a little flaky sea salt on top for extra flavor.
Easy Flavor Ideas
- Swap peanut butter for almond butter for a milder taste.
- Add a teaspoon of cinnamon for a cozy fall flavor.
- Use white chocolate chips for a sweeter, creamy topping.
- Mix in a tablespoon of chia seeds for extra crunch.
- Try a chocolate protein powder for double the chocolate.
FAQs
Can I use a different protein powder?
Yes, you can use whey or plant-based protein. Keep in mind that plant-based powders often absorb more liquid. You might need an extra splash of almond milk.
What if my dough is too crumbly?
Simply add one more tablespoon of almond milk. Mix it well until the dough holds together when pressed. You want it to feel like soft cookie dough.
Are these bars gluten-free?
They are if you use certified gluten-free oat flour. Always check your protein powder labels to be sure. This makes them a safe and healthy snack for everyone.
I hope these homemade protein bars bring a little ease to your busy week. They are such a simple way to keep your family fueled and happy. Enjoy every chewy, chocolatey bite!
— Katie Wood

Ingredients
- 2 cups certified gluten-free oat flour
- 1 cup vanilla whey or plant-based protein powder
- 1/2 cup natural creamy peanut butter
- 1/2 cup pure maple syrup or honey
- 1/4 cup unsweetened almond milk
- 1/2 teaspoon fine sea salt
- 1/2 cup dark chocolate chips
- 1 teaspoon coconut oil
Instructions
- Line an 8x8-inch square baking pan with parchment paper, leaving a slight overhang on two sides for easy removal.
- In a large mixing bowl, whisk together the oat flour, protein powder, and sea salt until no lumps remain.
- Add the natural peanut butter and maple syrup to the dry mixture. Stir with a stiff spatula until a thick, crumbly dough forms.
- Gradually add the almond milk, one tablespoon at a time, mixing thoroughly until the dough is moist enough to hold together when pressed between fingers but not sticky.
- Transfer the mixture to the prepared baking pan and press firmly into an even layer using a flat-bottomed glass or a spatula.
- In a small microwave-safe bowl, combine the dark chocolate chips and coconut oil. Heat in 30-second increments, stirring in between, until completely smooth.
- Pour the melted chocolate over the pressed bar mixture and spread evenly to the edges.
- Place the pan in the refrigerator for at least 30 minutes to allow the base to firm up and the chocolate to set.
- Using the parchment overhang, lift the block out of the pan and place it on a cutting board.
- Slice into 12 equal rectangular bars using a sharp knife. Store in an airtight container in the refrigerator for up to 10 days.