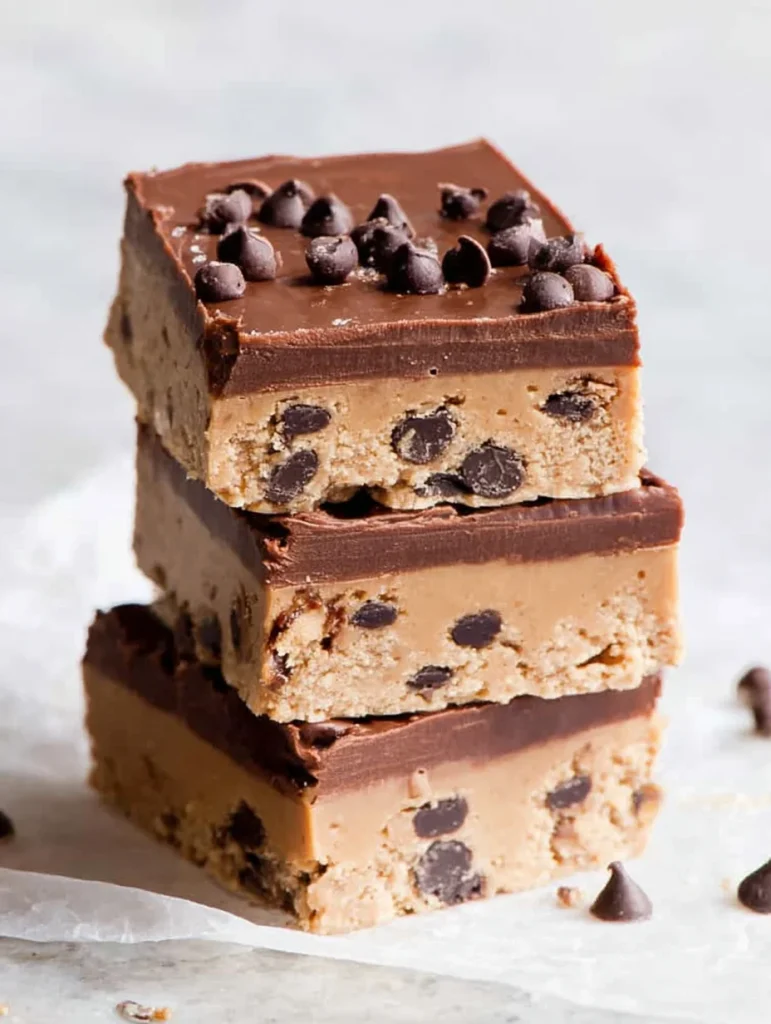
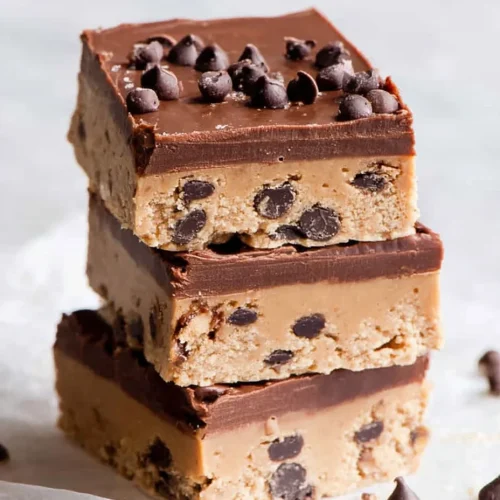
Craving that irresistible cookie dough flavor without the fuss of baking? These no-bake cookie dough bars are your answer! Combining the beloved taste of edible cookie dough with the convenience of a no-bake treat, this recipe delivers rich, decadent bars that taste exactly like your favorite cookie dough – but completely safe to eat.
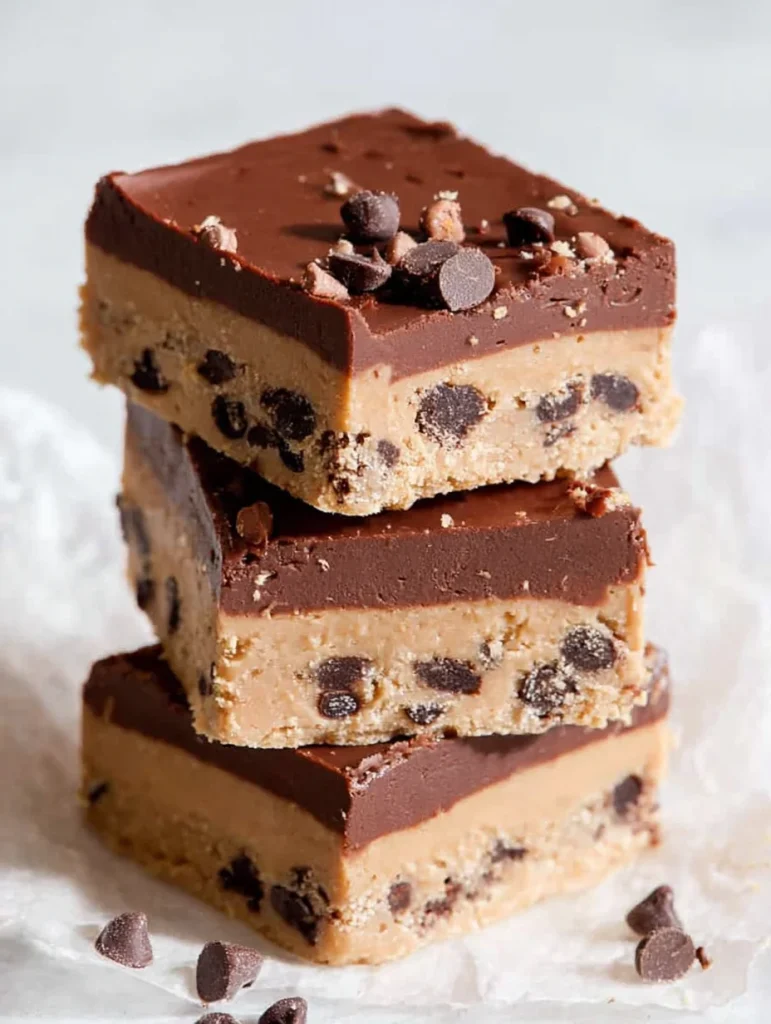
Table of contents
- Why You’ll Love These No-Bake Cookie Dough Bars
- Ingredients You’ll Need for Your Cookie Dough Bars
- Step-by-Step Instructions: Crafting Your No-Bake Treats
- Expert Tips for Perfect No-Bake Cookie Dough Bars
- Storage and Freezing Instructions
- Creative Variations & Customization Ideas
- Frequently Asked Questions
Perfect for hot summer days when you don’t want to turn on the oven, these bars come together in minutes and require just a handful of pantry staples. Plus, they’re easily customizable to fit any dietary need, from vegan and gluten-free to nut-free options.
Why You’ll Love These No-Bake Cookie Dough Bars
Incredibly Easy & Quick (No Baking Required!)
These bars are the ultimate quick dessert solution. With minimal prep time and no baking required, you can have a batch ready in under 15 minutes of active work. The food processor does 95% of the heavy lifting, making this a foolproof treat that’s perfect for busy weeknights or last-minute dessert emergencies.
The simple process involves mixing ingredients, pressing into a pan, and chilling – that’s it! No preheating ovens, no worrying about overbaking, and no waiting for cookies to cool. This makes them an ideal summer dessert when you want something sweet but don’t want to heat up your kitchen.
Healthy & Allergen-Friendly
Unlike traditional cookie dough that contains raw eggs and excessive amounts of butter and sugar, these bars use wholesome ingredients that actually nourish your body. The recipe is naturally egg-free, making it completely safe to eat without any food safety concerns.
You can easily make these bars vegan by using dairy-free butter and milk alternatives. They’re also naturally gluten-free when made with certified gluten-free oats or almond flour. For those with nut allergies, sunflower seed butter works perfectly as a substitute. The bars are also soy-free and can be made oil-free by using tahini instead of traditional butter.
The base uses ingredients like oats, dates, and nut butter – all providing fiber, healthy fats, and natural sweetness. Even the flour is heat-treated for safety, eliminating any potential bacteria while maintaining that authentic cookie dough texture.
Unbelievably Delicious & Customizable
Don’t let the healthy ingredients fool you – these bars taste absolutely heavenly. They deliver that authentic cookie dough flavor you’re craving, with a rich, sweet taste that satisfies even the most demanding sweet tooth. Many describe them as the perfect combination of edible cookie dough and brownie dough.
The beauty lies in their customizability. Add peanut butter chips for a nutty twist, white chocolate chunks for extra sweetness, or colorful M&M’s for a fun treat. Crushed nuts, mini marshmallows, or even a sprinkle of sea salt can transform these basic bars into gourmet treats tailored to your preferences.
Freezer-Friendly & Perfect for Any Occasion
These bars are a lifesaver for entertaining. They can be made days or even weeks ahead and stored in the freezer, making them perfect for birthday parties, potlucks, or whenever you need a crowd-pleasing dessert on hand.
They slice beautifully and hold their shape well, making them ideal for serving at gatherings. Kids and adults alike go crazy for them, and they’re sophisticated enough for dinner parties yet simple enough for casual family treats.
Ingredients You’ll Need for Your Cookie Dough Bars
The beauty of this recipe lies in its use of basic pantry staples that you likely already have on hand. Each ingredient serves a specific purpose in creating the perfect texture and flavor.
For the Edible Cookie Dough Layer
Flour (All-Purpose, Almond, or Oat Flour)
The flour provides structure and that essential cookie dough texture. Always heat-treat your flour first – this crucial step eliminates any potential bacteria, making your cookie dough completely safe to eat. Simply microwave 1½ cups of flour in 30-second intervals, stirring between each, until it reaches 165°F, or bake it at 300°F for 5 minutes.
For gluten-free options, oat flour works wonderfully and adds a subtle nutty flavor. You can make your own by grinding certified gluten-free oats in a food processor until fine. Almond flour creates a richer, more indulgent texture but will make the bars slightly more crumbly.
Butter (Regular or Vegan Butter)
You’ll need 1 cup of softened butter for the cookie dough layer, plus an additional ½ cup of melted butter if you’re making the optional brownie base. The butter provides richness and helps bind all ingredients together.
For vegan options, any good-quality plant-based butter works perfectly. Coconut oil can be substituted but may result in a slightly firmer texture when chilled. Make sure your butter is properly softened for easy mixing – it should give slightly when pressed but not be melted.
Sweeteners (Granulated Sugar, Brown Sugar, Maple Syrup, Coconut Sugar, Medjool Dates)
The sweetener combination is key to achieving that perfect cookie dough flavor. Traditional recipes use ½ cup granulated sugar and ¼ cup brown sugar – the brown sugar adds that characteristic molasses flavor that makes cookie dough so irresistible.
For healthier versions, maple syrup works as both a sweetener and binding agent, while Medjool dates provide natural sweetness and help hold everything together. Coconut sugar is another excellent option that adds subtle caramel notes.
Fat Source (Cashew Butter, Tahini, or Alternatives)
This is where the magic happens in healthier versions. Cashew butter creates an incredibly creamy, neutral-tasting base that mimics traditional butter perfectly. You can use store-bought or make your own by processing raw cashews until smooth and creamy.
Tahini (sesame seed paste) is another fantastic option, especially the smooth variety. Look for brands like Soom or Seed + Mill for the creamiest results. The key is using a smooth, well-mixed tahini – avoid separated or thick varieties.
Almond butter, sunflower seed butter, or even peanut butter can be substituted, though peanut butter will significantly change the flavor profile. If using unsalted nut butter, add an extra pinch of salt to balance the sweetness.
Vanilla Extract & Salt
Never underestimate the power of good-quality vanilla extract – it’s what gives these bars that authentic cookie dough flavor. Use pure vanilla extract rather than imitation for the best taste.
Salt is crucial for balancing sweetness and enhancing all other flavors. Even if your nut butter is salted, a pinch of additional salt helps all the flavors pop.
Milk (Dairy or Non-Dairy)
A small amount of milk helps achieve the perfect consistency. Any type works – dairy milk, almond milk, oat milk, or coconut milk. Start with 2-3 tablespoons and add more as needed to reach your desired texture.
For the Optional Brownie Dough Base
This unique addition sets these bars apart from basic cookie dough recipes. The brownie base adds depth and creates a luxurious two-layer treat. You’ll need unsweetened cocoa powder to create this rich chocolate foundation that pairs perfectly with the cookie dough layer.
Chocolate Chips & Fun Mix-Ins
Mini chocolate chips are classic, but the options are endless. Dark chocolate chunks, white chocolate chips, or dairy-free alternatives all work beautifully. For fun variations, try crushed Oreos, colorful sprinkles, chopped nuts, or candy pieces like M&M’s or Reese’s pieces.
Step-by-Step Instructions: Crafting Your No-Bake Treats
Preparing Your Pan
Start by lining an 8×8 square baking pan or 9×5 loaf pan with parchment paper, leaving some overhang on the sides. This parchment “sling” is crucial for easy removal later – don’t skip this step! The overhang acts as handles, preventing your bars from crumbling when you lift them out.
Making the Edible Brownie Dough Base (Optional)
If you’re adding the brownie layer, start here. In a medium bowl, whisk together ½ cup melted butter with ¼ cup granulated sugar and ¼ cup brown sugar until smooth. Stir in 1 teaspoon vanilla extract, then whisk in ¼ cup unsweetened cocoa powder until no lumps remain.
Add ¾ cup heat-treated flour and a pinch of salt, stirring until just combined. The mixture should hold together when pressed. Press this mixture firmly and evenly into your prepared pan, then refrigerate while you prepare the cookie dough layer.
Crafting the Edible Cookie Dough Layer
In a large bowl, beat 1 cup softened butter with ½ cup granulated sugar and ¼ cup brown sugar until light and fluffy – about 2-3 minutes with an electric mixer. Beat in 3 tablespoons milk and 1 teaspoon vanilla extract until combined.
Gradually mix in 1½ cups heat-treated flour and ½ teaspoon salt until a soft dough forms. If the mixture seems too dry or crumbly, add milk 1 tablespoon at a time until it reaches the right consistency. The dough should hold together when pressed but not be sticky.
Fold in ¾ cup mini chocolate chips, reserving some for the top if desired.
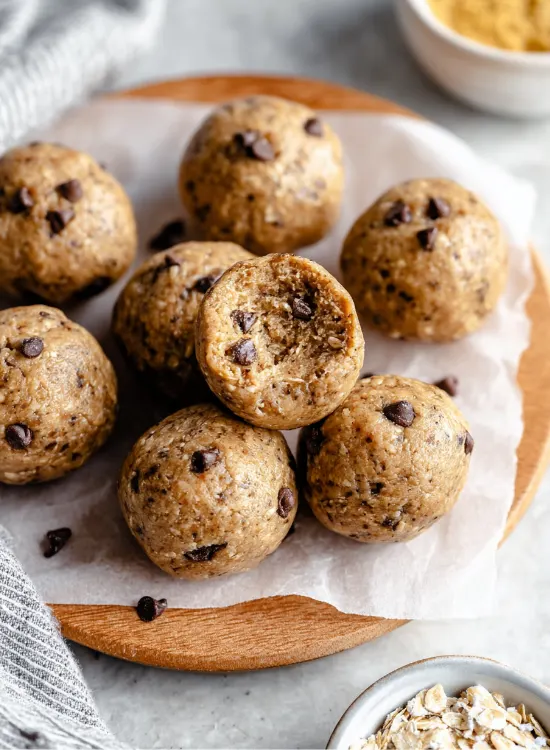
For healthier versions using a food processor: Combine 2 cups old-fashioned oats, 8-10 pitted Medjool dates, ½ cup cashew butter or tahini, 2 tablespoons maple syrup, 1 teaspoon vanilla, and a pinch of salt. Process until the mixture forms a dough that holds together when pressed. Add chocolate chips and pulse briefly to combine.
Layering & Chilling
Spread the cookie dough evenly over the brownie base (if using), or directly into your prepared pan. Press down firmly and evenly – using the bottom of a measuring cup or offset spatula helps create a smooth, even surface.
Cover and refrigerate for at least 1.5-2 hours, or freeze for 30 minutes if you’re in a hurry. The bars need to be completely firm before adding the chocolate topping and cutting.
Adding the Perfect Chocolate Topping
For an extra indulgent finish, melt ½ cup chocolate chips with 1 tablespoon cashew butter (optional) in the microwave in 30-second intervals, stirring between each, until smooth. A tiny drizzle of coconut oil will give the chocolate a beautiful glossy finish.
Drizzle the melted chocolate over the chilled bars and spread evenly. Sprinkle with flaky sea salt or extra chocolate chips if desired. Return to the refrigerator for 15-20 minutes to set the chocolate.
Final Chill, Slice, and Enjoy!
Once the chocolate is set, use the parchment paper to lift the bars from the pan. Place on a cutting board and use a sharp knife to cut into squares. For the cleanest cuts, let frozen bars sit at room temperature for 5-10 minutes to prevent cracking, and wipe your knife clean between cuts.
Cut into small squares – these bars are rich and a little goes a long way! Store covered in the refrigerator until ready to serve.
Expert Tips for Perfect No-Bake Cookie Dough Bars
Achieving the Right Dough Consistency
The perfect cookie dough should hold together when pressed but not be sticky or wet. If your dough is too crumbly, gradually add milk 1 tablespoon at a time until it reaches the right consistency. This often happens when flour is over-measured or if you’re in a dry climate.
If the dough becomes too sticky, don’t panic – simply chill it in the refrigerator for 15-20 minutes. The cold temperature will firm it up and make it much easier to work with.
Optimal Chilling and Setting Times
Patience is key with these bars! While they’ll hold together after 90 minutes of chilling, the texture is significantly better after 2-3 hours or overnight. The longer chill time allows flavors to meld and the texture to become perfectly firm yet still tender.
For best results, chill overnight before cutting. This ensures clean cuts and the ideal texture that’s firm enough to hold its shape but still soft enough to bite through easily.
Cutting and Serving Suggestions
These bars are incredibly rich, so cut them into small squares – about 1-2 inch pieces. A sharp knife is essential for clean cuts. If you’ve stored them in the freezer, let them sit at room temperature for 5-10 minutes before cutting to prevent cracking.
For special occasions, dust with powdered sugar or drizzle with additional melted chocolate just before serving.
Ingredient Substitution Insights
Understanding ingredient roles helps you make successful substitutions. The flour provides structure, so gluten-free flours work well but may slightly change texture. Nut and seed butters can be swapped freely, but remember that strong-flavored options like peanut butter will change the overall taste.
Liquid sweeteners like maple syrup can replace granulated sugar, but you may need to adjust the flour slightly to maintain the right consistency.
The Importance of Parchment Paper
Never skip the parchment paper! It’s not just for easy removal – it actually prevents the bars from crumbling when you lift them out. The parchment acts as a sling that supports the entire block, keeping everything intact.
Storage and Freezing Instructions
Refrigerator Storage
Store your finished bars covered in the refrigerator for up to one week. They’ll maintain their best texture when kept cold, though they can sit at room temperature for short periods without becoming too soft.
For serving, let refrigerated bars sit out for 5-10 minutes – this slight warming creates the perfect tender texture that’s easy to bite through.
Freezer Storage
These bars freeze beautifully for up to 2-3 months. For best results, slice them before freezing and store in a freezer-safe bag or container with parchment paper between layers.
To serve frozen bars, thaw them in the refrigerator for a few hours or at room temperature for 15-20 minutes. They’re also delicious eaten straight from the freezer for a firmer, almost ice cream-like texture.
Room Temperature Considerations
While these bars can sit at room temperature for serving at parties, they will soften significantly in warm weather. They’re perfectly safe at room temperature for several hours, but keep them in a cool spot and return leftovers to the refrigerator promptly.
Creative Variations & Customization Ideas
Holiday & Occasion Specific Tweaks
Transform these basic bars for any celebration! Add red and green sprinkles for Christmas, orange and black for Halloween, or pastel colors for Easter. Heart-shaped sprinkles make them perfect for Valentine’s Day.
For elegant dinner parties, top with a drizzle of white chocolate and a sprinkle of edible gold dust, or press chopped pistachios into the top before chilling.
Flavor Profile Changes
Switch up the chocolate chips for completely different flavors. White chocolate chips create a sweeter, more indulgent treat, while dark chocolate chunks add sophistication. Try mixing different types of chocolate for complexity.
For peanut butter lovers, substitute peanut butter chips and add a tablespoon of peanut butter to the dough. If you’re looking for more peanut butter treats, try our peanut butter protein cookies or peanut butter protein balls for similar flavors in different forms. Crushed pretzels add a delightful salty crunch that balances the sweetness perfectly.
Nutrient Boosters
Boost the nutritional value by adding 2 tablespoons of ground chia seeds or flax seeds to the dough – they’ll add omega-3 fatty acids and fiber without affecting the taste. For more information on incorporating chia seeds into your diet, check out our chia seed water recipe.
A scoop of vanilla protein powder can turn these into post-workout treats. Just adjust the liquid slightly as protein powder can make the mixture drier. For more protein-packed breakfast options, try our banana protein muffins for a nutritious way to start your day.
Beyond the Bar: Bites & Truffles
Don’t limit yourself to bars! This same dough can be rolled into bite-sized balls and coated in coconut, cocoa powder, or crushed nuts for elegant truffles. Chill the dough first to make rolling easier, and store the finished bites in the refrigerator.
For similar bite-sized treats, try our blueberry cheesecake protein bites or rice krispies energy balls for variety in your healthy dessert repertoire.
No Bake Cookie Dough Bars
Equipment
- 8×8 inch square baking pan or 9×5 loaf pan
- Electric mixer (hand or stand)
- Large mixing bowls
- Measuring cups and spoons
- Parchment paper
- Microwave-safe bowl (for melting chocolate)
- Sharp knife for cutting
Ingredients
For the Cookie Dough Layer:
- 1½ cups all-purpose flour heat-treated
- 1 cup unsalted butter softened (or vegan butter)
- ½ cup granulated sugar
- ¼ cup brown sugar packed
- 3 tablespoons milk dairy or non-dairy
- 1 teaspoon vanilla extract
- ½ teaspoon salt
- ¾ cup mini chocolate chips
For Optional Chocolate Topping:
- ½ cup chocolate chips
- 1 tablespoon cashew butter optional, for extra creaminess
- 1 teaspoon coconut oil optional, for gloss
- Pinch of flaky sea salt
For Optional Brownie Base:
- ½ cup unsalted butter melted
- ¼ cup granulated sugar
- ¼ cup brown sugar packed
- 1 teaspoon vanilla extract
- ¼ cup unsweetened cocoa powder
- ¾ cup heat-treated all-purpose flour
- Pinch of salt
Instructions
- Prepare the Pan: Line an 8×8 inch square pan with parchment paper, leaving overhang for easy removal.
- Heat-Treat Flour: Microwave flour in 30-second intervals, stirring between each, until it reaches 165°F (about 1-2 minutes total). Alternatively, bake at 300°F for 5 minutes. Let cool completely.
- Make Brownie Base (Optional): Whisk melted butter with both sugars until smooth. Add vanilla, then cocoa powder until no lumps remain. Stir in heat-treated flour and salt. Press firmly into prepared pan and refrigerate while making cookie dough.
- Make Cookie Dough: In a large bowl, beat softened butter with both sugars until light and fluffy (2-3 minutes). Beat in milk and vanilla extract.
- Add Dry Ingredients: Gradually mix in heat-treated flour and salt until soft dough forms. If too dry, add milk 1 tablespoon at a time.
- Fold in Chocolate Chips: Gently fold in ¾ cup mini chocolate chips, reserving some for topping if desired.
- Assemble: Spread cookie dough evenly over brownie base (if using) or directly into prepared pan. Press down firmly with the back of a spoon or measuring cup.
- Chill: Refrigerate for 1.5-2 hours or freeze for 30 minutes until completely firm.
- Add Chocolate Topping (Optional): Melt chocolate chips with cashew butter and coconut oil in microwave in 30-second intervals until smooth. Drizzle over chilled bars and sprinkle with sea salt.
- Final Chill: Refrigerate 15-20 minutes to set chocolate topping.
- Cut and Serve: Use parchment overhang to lift bars from pan. Cut into 16 squares with a sharp knife. Serve chilled.
Notes
- Food Safety: Always heat-treat flour to eliminate potential bacteria. This step is crucial for safe consumption of raw cookie dough.
- Storage: Store covered in refrigerator for up to 1 week or freeze for up to 3 months. Let frozen bars sit 5-10 minutes before cutting.
- Vegan Version: Use vegan butter and non-dairy milk. Ensure chocolate chips are dairy-free.
- Gluten-Free: Substitute heat-treated flour with certified gluten-free oat flour or almond flour (may slightly change texture).
- Consistency Tips: If dough is crumbly, add milk 1 tablespoon at a time. If too sticky, chill for 15-20 minutes before pressing into pan.
- Serving Size: Cut into small squares as these bars are very rich and indulgent.
Frequently Asked Questions
Yes, absolutely! Heat-treating flour eliminates potentially harmful bacteria like E. coli that can be present in raw flour. Simply microwave the flour in 30-second intervals until it reaches 165°F, or bake at 300°F for 5 minutes.
When stored properly in an airtight container, these bars will stay fresh in the refrigerator for up to one week. The texture actually improves after the first day as flavors meld together.
Yes! These bars freeze excellently for up to 2-3 months. Slice them before freezing and store with parchment paper between layers for easy serving.
Tahini, almond butter, sunflower seed butter, or even peanut butter all work well. Keep in mind that peanut butter will significantly change the flavor profile, while tahini and sunflower seed butter maintain a more neutral taste.
Use vegan butter and non-dairy milk for the vegan version. For gluten-free, substitute the all-purpose flour with certified gluten-free oat flour or almond flour. Make sure your chocolate chips are also vegan and gluten-free.
Add liquid gradually – start with 1 tablespoon of milk at a time until the dough holds together when pressed. This usually happens when flour is over-measured or in dry climates.
You’ll need basic mixing bowls, measuring cups and spoons, an electric mixer (hand or stand), and an 8×8 baking pan. A food processor is helpful for healthier versions but not essential.
While they’re treats, these bars can be made healthier than traditional cookies by using wholesome ingredients like oats, dates, nut butter, and reducing added sugars. The healthy versions provide fiber, protein, and healthy fats.
These no-bake cookie dough bars prove that you don’t need an oven to create something absolutely delicious. Whether you’re looking for a quick weeknight dessert, a make-ahead treat for entertaining, or a healthier way to satisfy your cookie dough cravings, this recipe delivers on all fronts. The combination of ease, customizability, and incredible flavor makes these bars a recipe you’ll return to again and again.
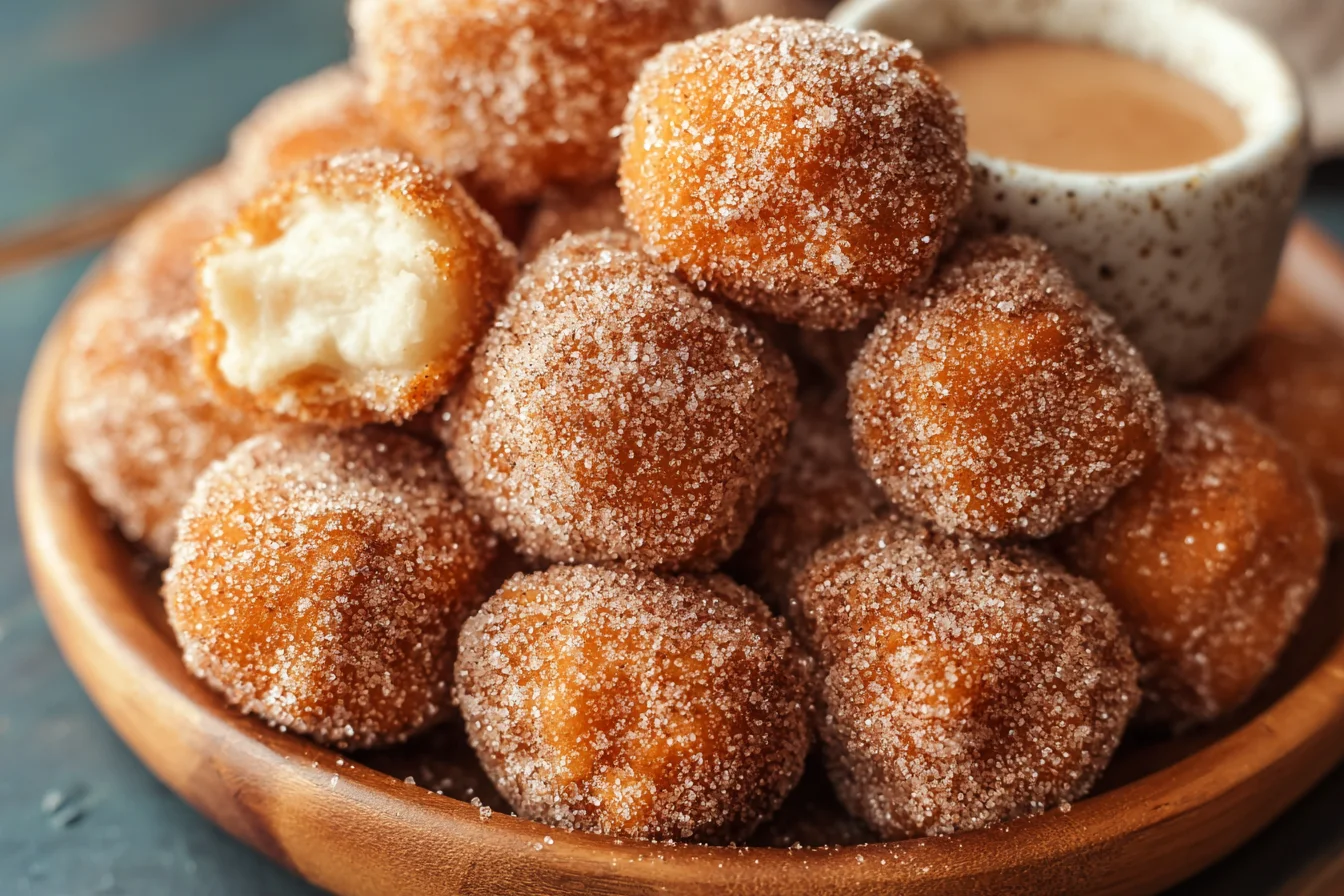
For more indulgent treats, explore our chocolate avocado mousse for a healthier chocolate fix, or try our protein chocolate brownie if you’re craving something similar but with a fudgier texture. If you love the convenience of no-bake treats, our 3-ingredient banana donut holes are equally simple and satisfying.
So grab your mixing bowl and get ready to create the cookie dough bars of your dreams – no baking required!